
Lock and unlock projects
In addition to monitoring your students’ progress, you can lock and unlock steps of their projects, allowing you to review their work before letting them move on to the next step. Certain steps are locked by default; however, you can change these settings in each project using the Project Manager.
Use the key at the bottom of the screen to track the lock/unlock status of each student.

- Review Required — These are the areas where students will stop to have their work reviewed before being allowed to move on.
- No Review Required — These are the areas students will continue through without your review.
- Ready for Review — The student has reached a point in the project requiring your review.
- Approved — You have reviewed a student’s work and allowed him or her to continue to the next step.
- Work In Progress — Shows which step in the project a student is working on.
- Work Completed — Shows which step(s) in the project a student has completed.
- Take Another Look — Shows in which step(s), and how many times, you’ve asked a student to take another look at their work before advancing.
In the Project Manager, you can lock or unlock steps in the writing process for:
- Individual students, one step at a time
- All students at the same step
- All students at all steps
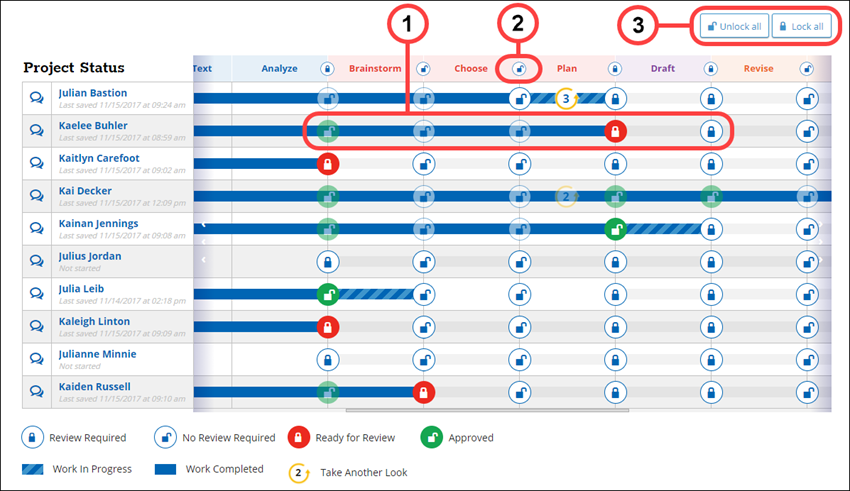
- Individual Students — The lock icons in a student's row allow you to lock or unlock each student separately at each step.
- All students at one step — Use the lock icons in the top stage banner to lock or unlock all students at one step.
- All students at all steps — Click Unlock all to unlock all steps for all students, or Lock all to lock all students at all steps.

|
Use the scroll bar at the bottom of the student progress grid to see previous steps to the left or future steps to the right of the current viewing window. |
Last Updated: February 06, 2025